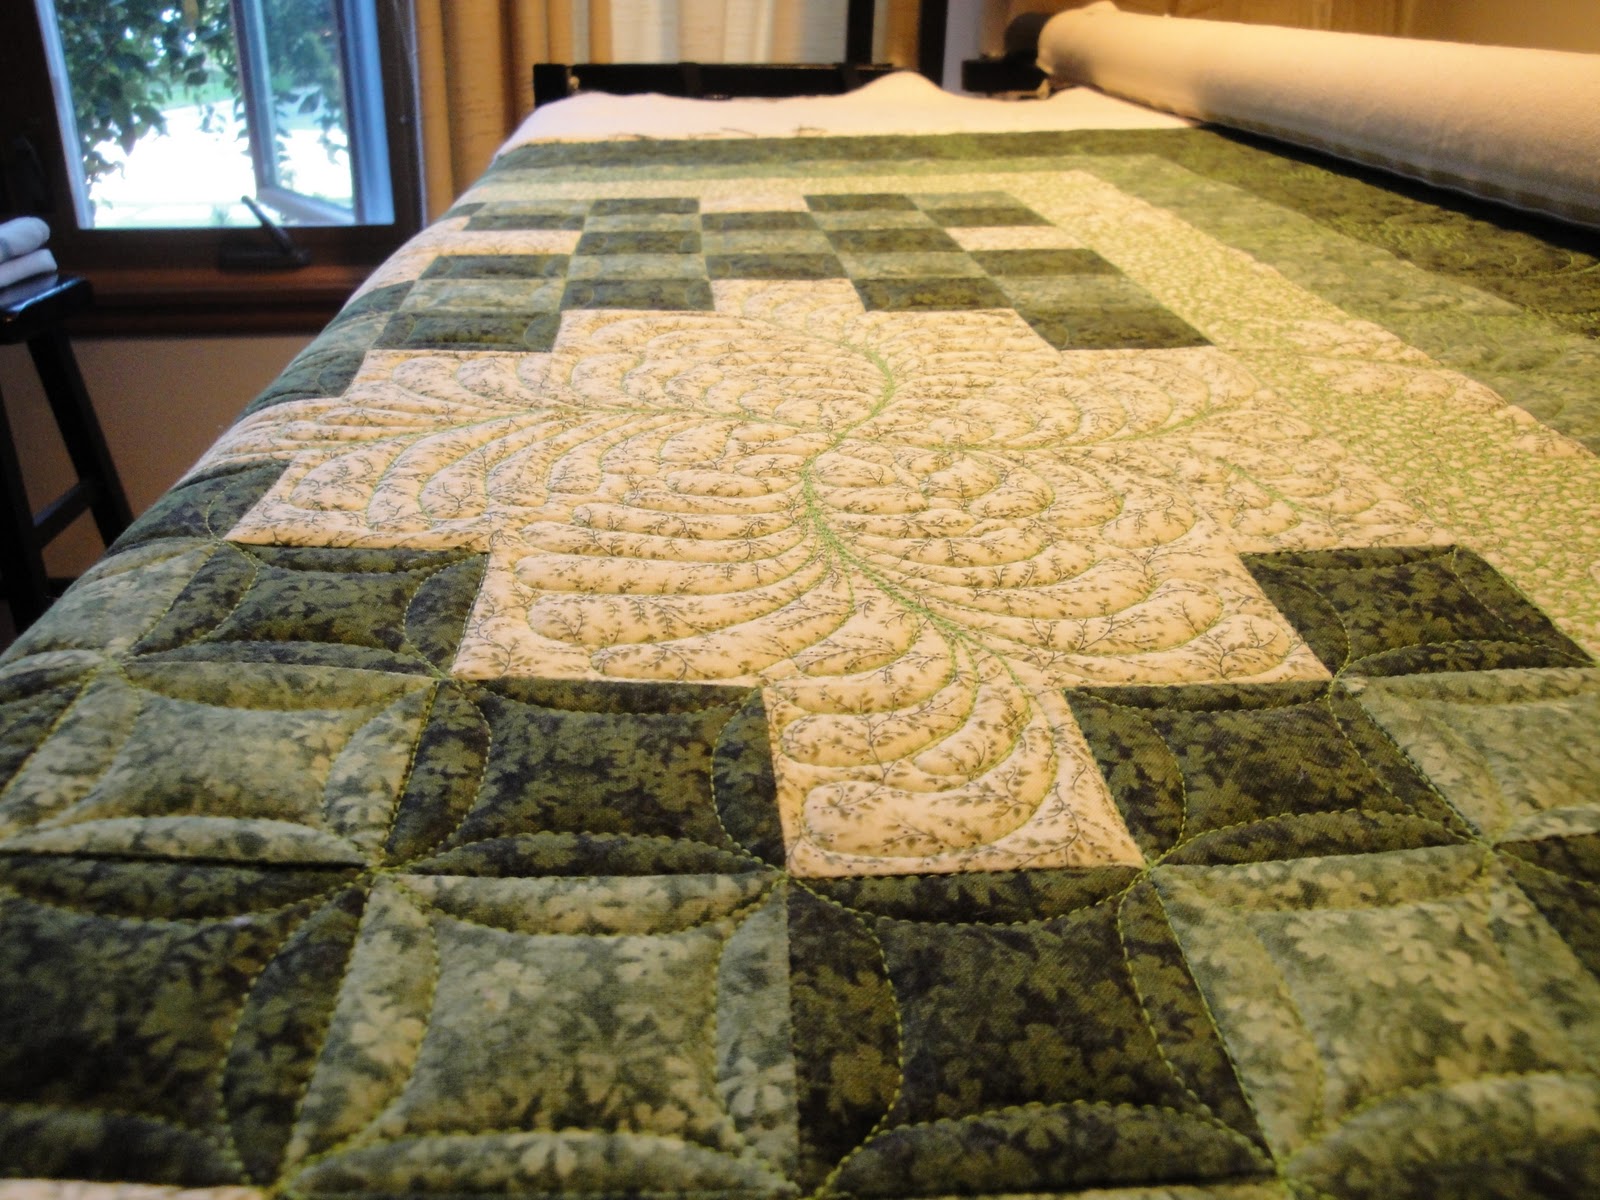
Yay!!! Almost done with "Ferns, Feathers, and Cobblestones"
Excited about going to the AQS show!! Photos to follow...
Thursday, September 29, 2011
Wednesday, September 28, 2011
Monday, September 26, 2011
Hello to my faithful few followers,
Our next Daisy project will be an insulated food carrier! Great gift idea or make one to transport your holiday goodies to wherever you are joining family or friends! Here's what you will need:
1 1/2 yard of home decor fabric
1 1/2 yard of Insul-bright
18 inches of Velcro hook & loop tape
wooden dowel rod
thread
sewing machine
basic sewing supplies
iron, pressing surface
Instructions to follow within the next few days.
Sunday, September 25, 2011

Last evening, we had the wonderful privilege of attending an Onam festival. Here is an explanation of the celebration. A special deaf friend of ours is from Kerala, India. We really enjoyed celebrating the festival with the group of people who have immigrated to Des Moines, IA from Kerala. We had a lot of fun!
Onam is the biggest festival in the Indian state of Kerala. Onam Festival falls during the Malayali month of Chingam (Aug - Sep) and marks the homecoming of legendary King Mahabali. Carnival of Onam lasts for ten days and brings out the best of Kerala culture and tradition. Intricately decorated Pookalam, ambrosial Onasadya, breathtaking Snake Boat Race and exotic Kaikottikali dance are some of the most remarkable features of Onam - the harvest festival in Kerala.

Saturday, September 24, 2011

Green Tomato Mincemeat
for the Irish in me!
Today is mincemeat day!! Gus and I used an old meat grinder and ground up 8 lbs of green tomatoes, 4 cups of raisins, 6 apples - cooked the tomatoes in a syrup of 1 quart of water with 4 lbs of brown sugar. Cooked all the tomatoes until transparent. Then added a cup of cider vinegar to 4 tbsp of cloves, 4 tbsp of cinnamon, 1 tbsp of salt, and 1/2 tbsp of pepper. We ground up the raisins and apples and mixed them with the cider vinegar mixture. We added that to the pot of brown sugar syrup and ground green tomatoes. Cooked it for about ten minutes and then canned the mixture in sterilized pint mason jars. 1 pint jar will work nicely for 1 double crust pie. I always add some little pats of butter on top of the pie filling before sealing with the top crust on the pie. We will reserve a few jars for our pantry, but will be sharing some with beloved friends and family for their holiday baking!
Friday, September 23, 2011

Thursday, September 22, 2011
Fleece Flower Project
Part 3

- For the flowers, I used pinking scissors. If you do not have pinking scissors, use regular scissors. They will work just fine. I kept it very simple, using the flower pattern as a guide for length, I simply cut squares approximately the same length. I simply rounded off the edges and cut a circle.

- Here is my little rounded flower base.

- Then, I simply did the same thing, with smaller squares, rounded off into circles.
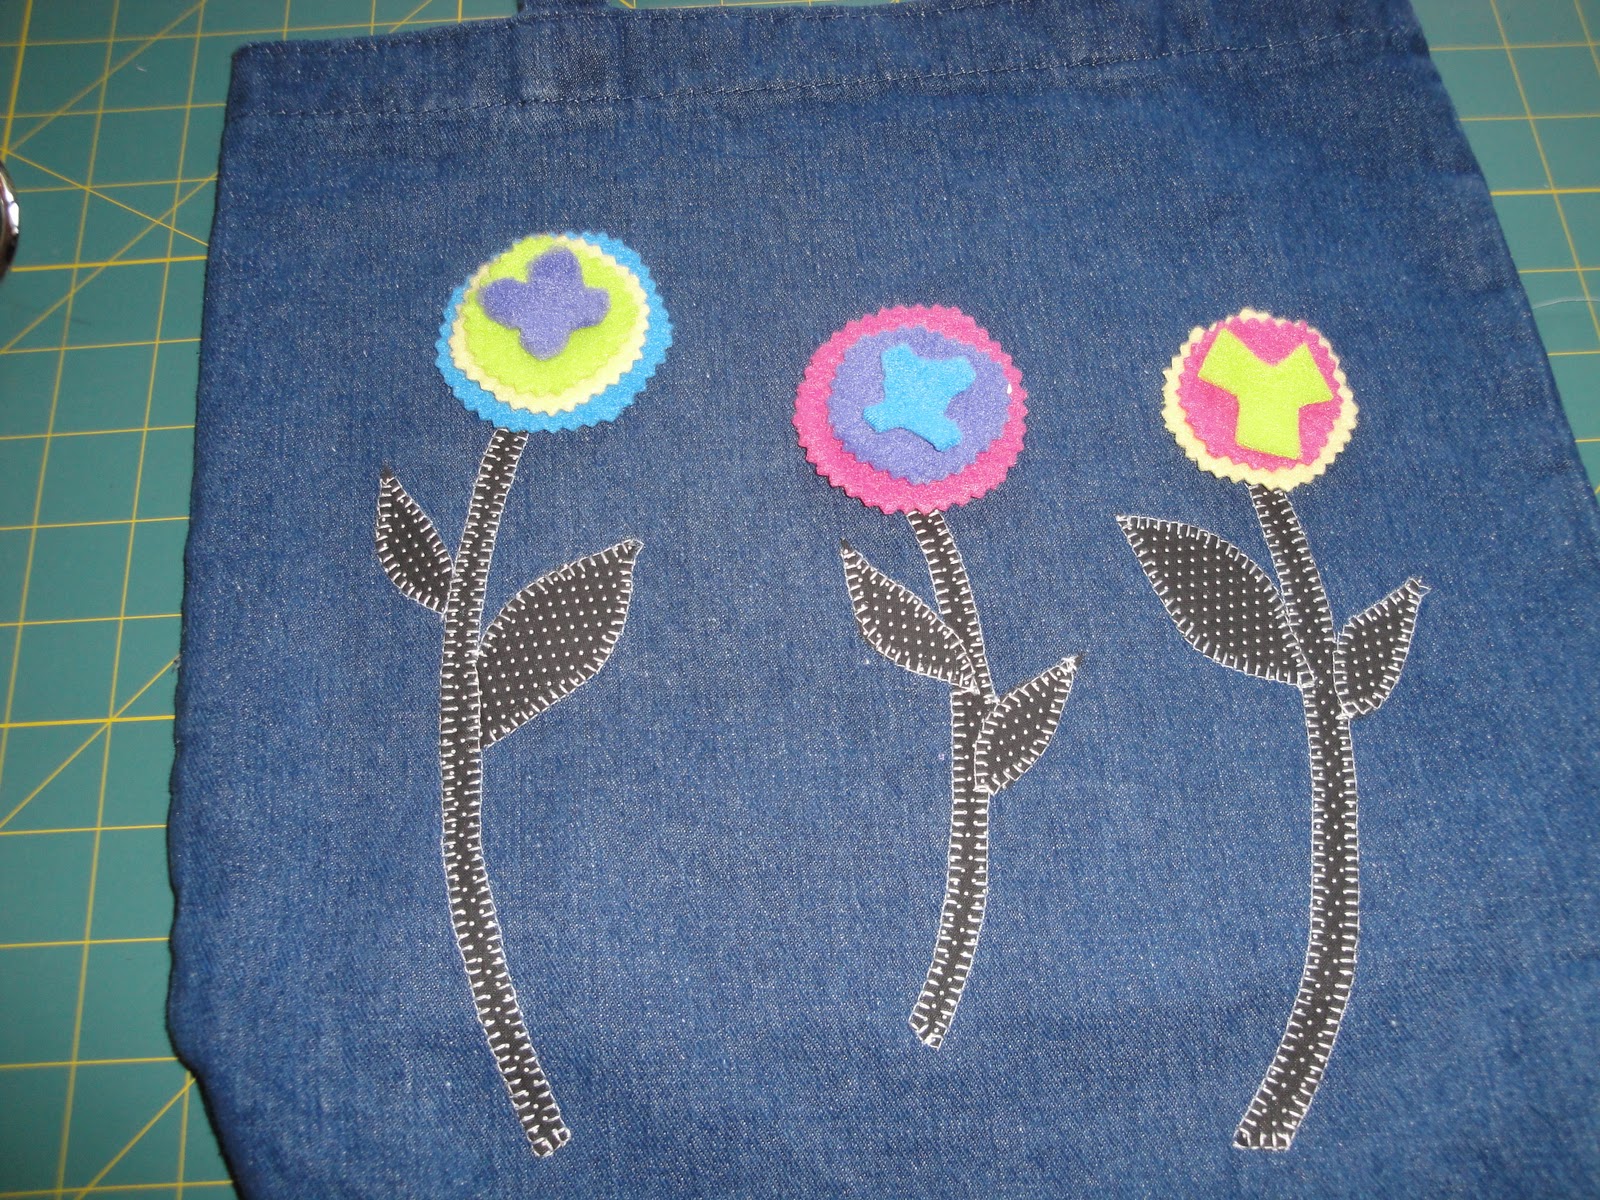
- As you can see, using my scissors, I just played with the shapes and colors until I had the flowers that I wanted.

- Then, I selected some buttons that made a nice contrast to the colors in the flowers.

- Putting the button on top, I audited my flowers until I was satified with the colors and shapes. Following this, my camera battery died!! : ) So, I will simply complete the instructions by explaining that I used black thread, because I liked the contrast. I threaded my needle and knotted it as a double strand of thread. This will enable the flowers to be firmly anchored to the tote bag. I simply hand stitched the flower unit to the tote bag, as if it were a button. Following the repeated stitches, I knotted the end by sewing several tiny stitches over and over on the wrong side of the fabric, inside the bag. I repeated this with the other two flowers. Voila!! A simple little bag with some pizzazz!! Hope you enjoyed our first little "Daisy project"!
Fleece Flower Project
Part 2

- Next step, you will work with the Heat n Bond to make the leaves and stems for your tote.


- Using your patterns that you sketched, place the Heat n Bond shiny side down, over your pattern. Trace the 3 stems, 2 large leaves, and 4 small leaves.

- Cut out the Heat n Bond (NOT on the lines!) outside of the lines with a little extra (approximately 1/2 to 1/4 inch)


- On your ironing board, lay your cotton fabric RIGHT SIDE DOWN. (You will press the Heat n Bond pieces onto the WRONG side of the fabric.)

- As you can see, I am using scraps of my fabric, left over from other projects. Place the Heat n Bond pieces with the shiny side down onto the WRONG side of the cotton fabric.

- Press with medium hot iron for 2 to 3 seconds. (Do not "iron" by moving back and forth! - simply press down so that the adhesive surface melts to the WRONG side of the fabric)


- Cut out the pieces by cutting on the line - through both the paper and the fabric.

- Your pieces will look like these in the above picture.

- Peel away the paper backing. Now you have a shiny side on the WRONG side of the pieces.

- Place the stems and leaves, shiny side down, onto your tote bag in whatever arrangement you like.

- Again, using the pressing movement, press each piece in place for 2 to 3 seconds. Check to make sure that the pieces are adhering to the fabric. You may need to turn your iron's temp up a bit. Each iron varies. My iron doesn't get as hot as I like in the medium setting, so I turn it to high. Test your iron and see what you need to do to make sure the adhesive melts and adheres well.


- For those of you who have sewing machines and would like - you can do this additional step. I used an overcast blanket stitch and stitched the edges of the stems and leaves. I personally like to have contrasting thread so that the stitching shows. For those of you who do not have a sewing machine. You can simply leave the leaves and stems as they were when you finished pressing them. Or, if you prefer, you can use a needle and thread and sew the edges by hand. If anyone would like further instructions how to do the overcast stitch by hand - comment on my blog and I will include separate instructions for that, if you wish.
The instructions for attaching the flowers will be included in Part 3.
Fleece Flower Project
(Free pattern obtained from JoAnn Fabrics)
We're ready to begin our first Daisy Project! I hope you have your materials all lined up and ready to go!
- First, you will want to press your canvas tote bag. I used spray starch and pressed mine to give the color-washed denim a little more stiffness for working with the iron on adhesive later in the project. You can simply press, or press with spray sizing or spray starch. The choice is entirely yours.

- These are the fleece remnants I am using for my flowers. Remember, you can use fleece remnants, pieces, or you can use felt remnants or felt pieces. Again, the choice is yours.

- Next, you will need some paper to draw some basic shapes. The measurements are written on the pictures to give you an idea of how you will draw the shapes. Remember, we're being artistic! You DO NOT need to panic or worry about being precise. We're having fun! So just make the patterns comfortably, without great concern for precision. Everything will work out well.

- The first drawing will look like this. You can click on the picture for a better view. We will be cutting the squiggly circles out of the fleece or felt. So, this gives you an idea of the sizing.

- These are the flower centers. They are just little whirly-gigs. You can play and sketch yours similar to these, or as you wish. Again, you can click on the picture for a better view.

- These are the leaves. We will cut these out of the cotton fabric.

- This is the long stem. You will also cut this out of the cotton fabric.

- This is the medium stem.

- This is the short stem.
This will get you started with your sketching. Watch for part 2 today, which will explain the construction of the flowers and how to use the iron-on adhesive with the stems and leaves.
Wednesday, September 21, 2011
Monday, September 19, 2011
Our First "Daisy Project"!!
Here's the scoop on our first "Daisy project"!
Fleece Flower Tote - great bag for "green shopping"... Can be used for veggies, groceries, or any kind of shopping... A great gift for ANYONE! Stay tuned to our blog for a finished-project picture and pictorial step by step instructions on Thursday, Sept. 22. That will give you a couple days to round up your supplies!
Here's what you will need: (All things are easily obtained from your local JoAnn's or Hobby Lobby)
- 1- canvas tote bag (preferably black, but any color will work- JoAnn has these for a reasonable price)
- Fleece fabric remnants size 8 x 10 inches (felt pieces will also work) Select different colors -You will need 9 or 10 pieces.
- 1/4 yard cotton fabric: plaid or stripe would work well.
- 6 colorful buttons (go ahead and use some old buttons - great way to re-purpose them!)
- 8 x 10 piece of "Heat and Bond" iron-on adhesive. (There are different brands of iron-on adhesive that you can purchase...my recommendation is "Heat and Bond" because that works the best for me. I've never been satisfied with the other products)
- Basic sewing supplies (needle, thread, iron, pressing surface)
Saturday, September 17, 2011
I'm planning a blog project for you to follow along. For new sewers, this will be fun and easy. Stayed tuned for further details and pictures for step by step instructions! It will be fun! When we are done - you will have a gift idea for Christmas!! Christmas in September! We're gonna get a head start!! Stay tuned!
Friday, September 16, 2011


Thursday, September 15, 2011
Wednesday, September 14, 2011
Just registered for the American Quilter's Society Show in Des Moines, Iowa !! I've signed up for "Thread Art Extreme" and two lectures on color theory! I'm very excited to attend the show which takes place September 28 through October 1st. Last year, AQS was so kind to provide interpreters for me to attend classes. Love being a member of AQS!! Unfortunetely, my attempts to attend the "Machine Quilter's Expo-West" in Portland, Oregon fell though. They are not able to provide me with interpreters. : ( Maybe when I win a lottery ; ) , I can afford to hire a local Iowa or Michigan interpreter and provide their travel and accommodations !! : ) Meanwhile, I'm very grateful to AQS : )
Back to work on "Ferns, Feathers, and Cobblestones" today!!
Back to work on "Ferns, Feathers, and Cobblestones" today!!
Tuesday, September 13, 2011


Monday, September 12, 2011

Sunday, September 11, 2011

Saturday, September 10, 2011

Friday, September 9, 2011
Good Morning, Everyone! I feel like it has been a "Pine Sol" morning! Busy, busy, busy - cleaning, so I can move on to my quilting. I feel a sense of achievement, since I was able to send off the "Quilt of Hearts" and the two "books" for my grand-daughter! Now, hoping to do some serious work on my sister's quilt!
By the way, if anyone would like to join my blog as a "follower" - scroll down, and on the left side you will see where you can click on "follow" this blog. : )
By the way, if anyone would like to join my blog as a "follower" - scroll down, and on the left side you will see where you can click on "follow" this blog. : )
Thursday, September 8, 2011
It is a lovely morning here in Pleasant Hill, Iowa. The sunshine smiling over the land with all of the fields of corn and soybeans smiling heavenward. The temperatures are so pleasant this week, my heart wants to sing thanksgiving for these gentle days. I've been busy this a.m. with paperwork duties, but not too busy to walk outside for my early morning walk to enjoy God's blessings visible in nature. I hope my blogging friends are also enjoying their day. I will be shipping the "Quilt of Hearts" to Boston today. I hope to finish two stories for my grand-daughter that I'm making in the Power Point software with photos of Grandma and Grand Gus visiting the Iowa State Fair. I hope she enjoys the books! It is fun to make Power-point books and put the pages in sheet-protectors and into a vinyl binder with the clear plastic sleeve on the front to place the book cover. It is my way of bridging the miles between Iowa and Boston. I want my little sweetie to KNOW her grandma!! Hope you, my blog friends, have a lovely day! Meanwhile, I'm reassuring my sewing machine that I will return to her very soon this afternoon! ; )


Subscribe to:
Posts (Atom)